- Developers
- Professional Navigation for Fleets
- Android
- FAQ
- How to use json geofiles
How to use json geofiles
You can use map overlay functionality of Sygic, which means showing your geo objects on top of the standard map.
The geo objects needs to be expressed within a single file in json format, called geofile.
Import
For the import of geo objects from a geofile into navigation you need to place your geo json file into the folder Res/geofiles
The import only occurs at the start of the application, and geo objects are shown on map immediately.
Please note the functionality is enabled under a special license option, resulting your license contains the setting geo=yes.
For the geofile import process you may check the ImportFile API function, which helps you to create a file in the Sygic application file space.
Geo objects
Sygic supports big portion of the geo json spec described in specification of GeoJSON
The list of features is the following, while additionally, Sygic supports extra attributes, which can be expressed in the properties structure:
| Feature | Description | Properties |
|---|---|---|
| FeatureCollection | encompassing geometries of Point, LineString and Polygon objects. Only 1D hierarchy is allowed | |
| Point | showing point with extra properties |
name (string) radius (int) color (string) borderColor (string) transparency (0 to 100) notificationEnabled (boolean) notificationData (string) |
| LineString | showing poly line with extra properties |
color (string) transparency (0 to 100) width (int) |
| Polygon | showing polygon with extra properties |
color (string) borderColor (string) borderHeight (int) transparency (0 to 100) avoid (boolean) speedLimit (int) speedLimitUnit (kmh or mph) notificationEnabled (boolean) notificationData (string) |
Examples
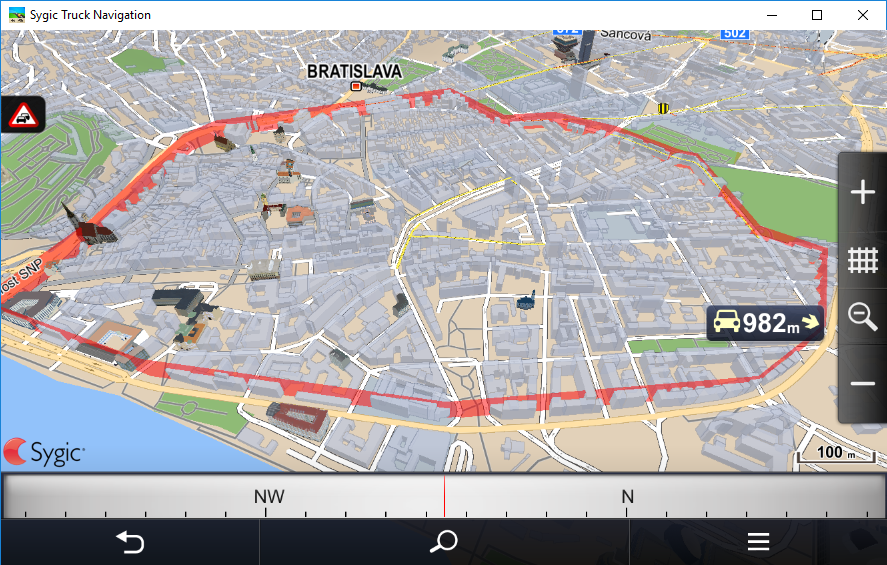
LineString example
Through the LineString feature you can create a polyline on map.
This example shows the feature to mimick a congestion zone in Bratislava, Slovakia.
{
  "type": "FeatureCollection",
  "features": [
    {
      "type": "Feature",
      "geometry": {
        "type": "LineString",
        "coordinates": [
          [
            [
              17.10498332977295,
              48.140031508601304
            ],
            [
              17.109768390655518,
              48.14013174129157
            ],
            [
              17.11599111557007,
              48.14114837609076
            ],
            [
              17.121548652648926,
              48.14309567667121
            ],
            [
              17.12292194366455,
              48.14444156183988
            ],
            [
              17.123329639434814,
              48.14641737187746
            ],
            [
              17.121763229370114,
              48.146646446381716
            ],
            [
              17.120046615600586,
              48.148865552713865
            ],
            [
              17.119531631469727,
              48.1488798692174
            ],
            [
              17.117300033569336,
              48.149423893392175
            ],
            [
              17.115089893341064,
              48.14952410774275
            ],
            [
              17.11348056793213,
              48.148822603179326
            ],
            [
              17.110884189605713,
              48.14965295447732
            ],
            [
              17.104403972625732,
              48.145816046439336
            ],
            [
              17.104146480560303,
              48.14501426822942
            ],
            [
              17.10474729537964,
              48.14210771722622
            ],
            [
              17.10498332977295,
              48.140031508601304
            ]
          ]
        ]
      },
      "properties": {
        "borderColor": "#FF0000",
        "transparency": 50
      }
    }
  ]
}
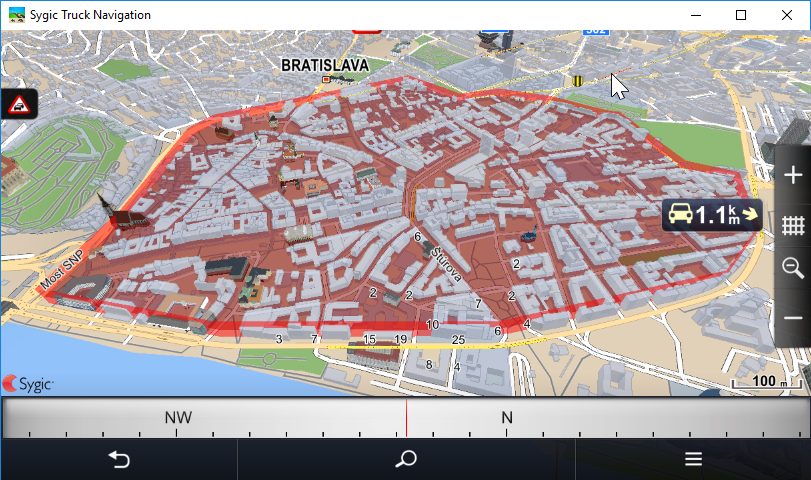
Polygon example
Through the Polygon feature you can create a closed region or zone, on which you can monitor vehicle movements for entering or leaving.
The json structure contains the attributes for supporting cross movements identification through the ApiEvent.EVENT_GEOFENCE, which are notificationEnable (for enabling notification events) and notificationData (for identification of a particular region/polygon).
This example shows the feature to mimick a congestion zone in Bratislava, Slovakia.
{
  "type": "FeatureCollection",
  "features": [
    {
      "type": "Feature",
      "geometry": {
        "type": "Polygon",
        "coordinates": [
          [
            [
              17.10498332977295,
              48.140031508601304
            ],
            [
              17.109768390655518,
              48.14013174129157
            ],
            [
              17.11599111557007,
              48.14114837609076
            ],
            [
              17.121548652648926,
              48.14309567667121
            ],
            [
              17.12292194366455,
              48.14444156183988
            ],
            [
              17.123329639434814,
              48.14641737187746
            ],
            [
              17.121763229370114,
              48.146646446381716
            ],
            [
              17.120046615600586,
              48.148865552713865
            ],
            [
              17.119531631469727,
              48.1488798692174
            ],
            [
              17.117300033569336,
              48.149423893392175
            ],
            [
              17.115089893341064,
              48.14952410774275
            ],
            [
              17.11348056793213,
              48.148822603179326
            ],
            [
              17.110884189605713,
              48.14965295447732
            ],
            [
              17.104403972625732,
              48.145816046439336
            ],
            [
              17.104146480560303,
              48.14501426822942
            ],
            [
              17.10474729537964,
              48.14210771722622
            ],
            [
              17.10498332977295,
              48.140031508601304
            ]
          ]
        ]
      },
      "properties": {
        "borderColor": "#FF0000",
        "color": "#800000",
        "notificationEnabled": true,
        "notificationData": "GEO123",
        "color": "#800000",
        "transparency": 50
      }
    }
  ]
}
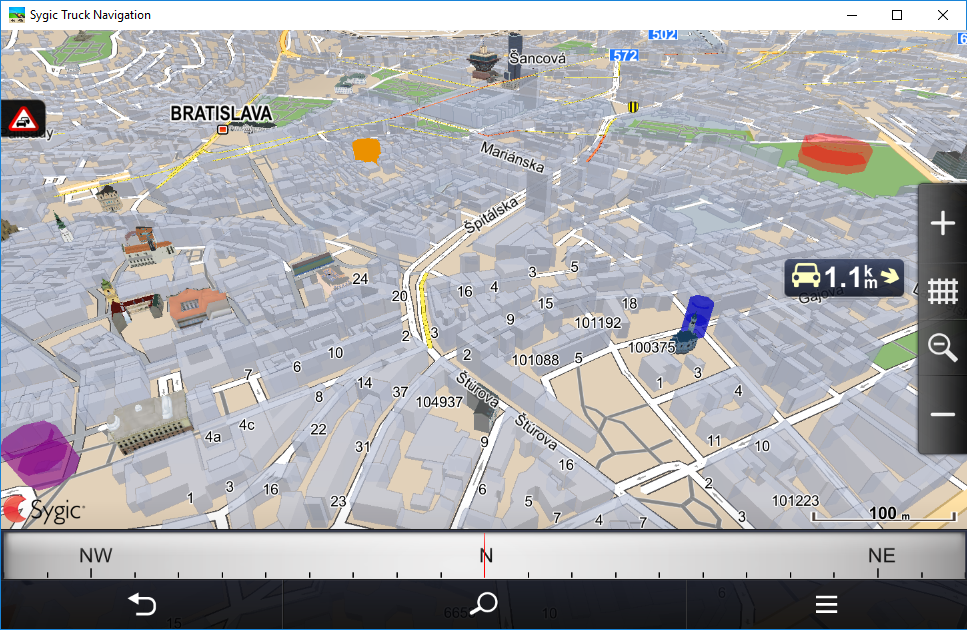
Point example
Through the Point feature you can create list of markers on map.
This example shows four markers in the seightseeing zone of Bratislava, Slovakia.
{
  "type": "FeatureCollection",
  "features": [
    {
      "type": "Feature",
      "properties": {
        "name": "Cemetery",
        "radius": 50,
        "transparency": 40,
        "color": "#FF0000",
        "borderColor": "#FF0000"
      },
      "geometry": {
        "type": "Point",
        "coordinates": [
          17.12264,
          48.14831
        ]
      }
    },
    {
      "type": "Feature",
      "properties": {
        "name": "National Theatre",
        "radius": 15,
        "transparency": 60,
        "color": "#840084",
        "borderColor": "#840084"
      },
      "geometry": {
        "type": "Point",
        "coordinates": [
          17.10933,
          48.14206
        ]
      }
    },
    {
      "type": "Feature",
      "properties": {
        "name": "Shopping street",
        "radius": 20,
        "transparency": 100,
        "color": "#EB9100",
        "borderColor": "#EB9100"
      },
      "geometry": {
        "type": "Point",
        "coordinates": [
          17.11120,
          48.14793
        ]
      }
    },
    {
      "type": "Feature",
      "properties": {
        "name": "Blue Church",
        "radius": 10,
        "transparency": 80,
        "color": "#1010BF",
        "borderColor": "#1010BF"
      },
      "geometry": {
        "type": "Point",
        "coordinates": [
          17.11699,
          48.14368
        ]
      }
    }
  ]
}
- Previous article: Support of Hybrid Itineraries
- Next article: How to use itineraries


