- Developers
- Professional Navigation for Fleets
- Windows
- Getting started
- Getting started using Windows C#
Getting started using Windows C#
Introduction
In the following we will guide you through creating a simple Windows CE application with embedding Sygic navigation engine.
In this example we will develop a simple window application, where you can type in an address string and through a custom button you can start navigation to that address.
Prepare your working environment
For being able to compile your application you need to have Microsoft Visual Studio on your computer.
As the key point you need to Download and Install Sygic SDK library on your computer from sdk package or try-sdk demo package.
You may want to install the Sygic navigation on your device in advance. Check Installation of 2D Navigation.
You will definitely need it at later stages when you want to test your application on device.
Not necessarily but we recommend first to test the compilation flow using the Example2D project within the Sygic SDK package. Check Run Demo.
Create new project
Let's start Visual Studio and create the new project MyApp through selecting New Project -> Windows -> Windows Form Application.
The project is automatically populated with several files, while these are relevant:
- Form1.cs, which is the placeholder for application coding
- Form1.Designer.cs, which will define graphical look of application
- Program.cs, which is the wrapper for MyApp application
Most important, the Form1.cs is created for us and it should look as follows:
...
namespace MyApp
{
    public partial class Form1 : Form
    {
        public Form1()
        {
            InitializeComponent();
        }
    }
}
Include Sygic Library
In Visual Studio Solution Explorer go to References and select Add Reference.
Browse through the Add Reference window and find the location of ApplicationAPI.NET.dll in the appropriate directory and import it.
Next, in the code include the Sygic API library and Microsoft thread library through using clause.
using System;
...
using ApplicationAPI;
using System.Threading;
Define graphical look
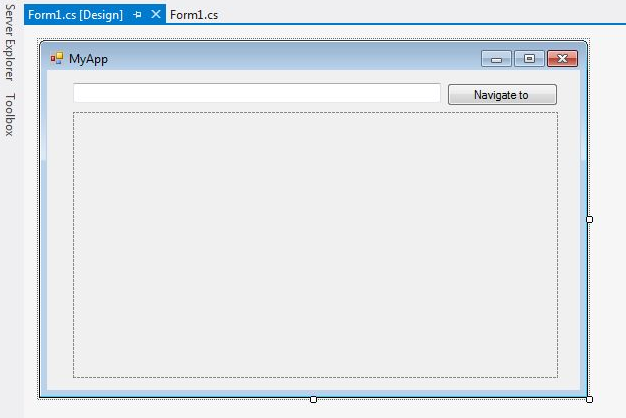
Add to the initial window form three control objects, which will visually define the application:
- panel control, which will serve for rendering the navigation map (name it panel1)
- textbox control, which will serve for typing in a destination address (default name is textbox1)
- button control, which will serve for triggering navigation (default name is button1)
The windows should have the following appearance.

Code the application
The application will be written solely in Form1 class.
Define path to Sygic Navigation engine
Set class string constant, which defines the path to Sygic executable.
The path depends on your installation decision. The on-device installation of Sygic executable is described in Installation of Navigation.
For 3D version
private string SygicPath = "\\Storage card\\SygicNavigation\\Windows\\Sygic.exe";For 2D version:
private string SygicPath = "\\Storage card\\Sygic2D\\Drive\\WindowsCE\\Drive.exe";Store the panel control constants
The panel control handle (panel1) needs to be stored inside the class for further use within a thread function.
The panel control defines the handle and physical boundary for rendering Sygic navigation. The augmented constructor looks as follow.
...
        private IntPtr handle;
        private int width;
        private int height;

        public Form1()
        {
            InitializeComponent();
            handle = panel1.Handle;
            width = panel1.Width;
            height = panel1.Height;
        }
Initialize Sygic navigation
We need to call the API's initialization function from a dedicated thread. Let's create the thread in the constructor, which will open up the function SygicEngine to fill.
Within the function we need to call InitApi function. The intialization function requires mainly the path to executable, display size, handle to parent control. For more options check the documementation here.
        public Form1()
        {
            ...

            Thread t = new Thread(SygicEngine);
            t.Start();
        }

        private void SygicEngine()
        {
            if (CApplicationAPI.InitApi(SygicPath, null, 0, 0, width, height, true, false, handle) != 1)
            {
                Environment.Exit(0);
            }
        }
Close Sygic navigation
Let's execute the Sygic closing when exiting the application, which means attaching the operation to the Form Closing event.
In Visual Studio the function is automatically created when clicking on event FormClosing. Fill in the function with EndApplication and CloseApi API call.
private void Form1_FormClosing(object sender, FormClosingEventArgs e)
        {
            SError err;
            CApplicationAPI.EndApplication(out err, 0);
            CApplicationAPI.CloseApi();
            Environment.Exit(0);
        }
Bind Navigate operation to the custom button
In Visual Studio doubleclicking on the button will automatically create empty function to fill the desired operation.
We define the operation as first to read the text string from the textbox control (testbox1) and then pass it to Sygic NavigateToAddress API function.
private void button1_Click(object sender, EventArgs e)
        {
            string address = textbox1.Text;
            SError err;
            CApplicationAPI.NavigateToAddress(out err, address, false, 0, true, 0);
        }
Build and deploy the application
Building the application is simple as click Build button in Visual Studio. The result of the process is executable MyApp.exe, which just needs to be copied to your Windows device.
You also need to copy the Sygic Navigation executable to device on the path defined by MyApp (SygicEngine constant). If you have not done that yet please follow Installation of Navigation.
Finally you also need to make sure the correct runtime drivers are copied next to your MyApp.exe. If you have not done that yet please follow the Runtime Use in Installation of drivers.
Depending on your device the application MyApp.exe can be started from a OS shell or configured for starting with device power on.
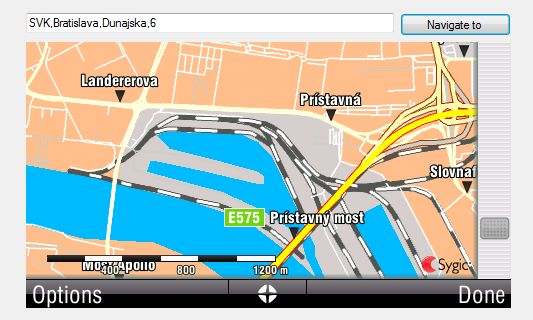
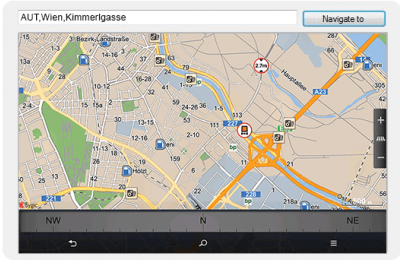
The running aplication will look as follows. It embeds the navigation map into a predefined window's area, and it allows you to type in an address and click on the button Navigate to to start navigating to that address.
2D version

3D version

Full sample reference
using System;
using System.Collections.Generic;
using System.ComponentModel;
using System.Data;
using System.Drawing;
using System.Text;
using System.Threading.Tasks;
using System.Windows.Forms;
using ApplicationAPI;
using System.Threading;

namespace MyApp
{
    public partial class Form1 : Form
    {
        private string SygicPath = "\\Storage card\\Sygic2D\\Drive\\WindowsCE\\Drive.exe";
        private IntPtr handle;
        private int width;
        private int height;

        public Form1()
        {
            InitializeComponent();
            handle = panel1.Handle;
            width = panel1.Width;
            height = panel1.Height;

            Thread t = new Thread(SygicEngine);
            t.Start();
        }

        private void SygicEngine()
        {
            if (CApplicationAPI.InitApi(SygicPath, null, 0, 0, width, height, true, false, handle) != 1)
            {
                Environment.Exit(0);
            }
        }

        private void Form1_FormClosing(object sender, FormClosingEventArgs e)
        {
            SError err;
            CApplicationAPI.EndApplication(out err, 0);
            CApplicationAPI.CloseApi();
            Environment.Exit(0);
        }

        private void button1_Click(object sender, EventArgs e)
        {
            string address = tbAddress.Text;
            SError err;
            CApplicationAPI.NavigateToAddress(out err, address, false, 0, true, 0);
        }

    }
}

